No Products in the Cart
Every cannabis grower experiences that familiar knot of anxiety as their plants approach harvest time. Cut too early, and you sacrifice potency and yield. Wait too long, and you risk degradation of those precious cannabinoids you've spent months cultivating. For growers focused on THCA flower ready to harvest, timing is everything—and the pressure to get it right can feel overwhelming.
If you've found yourself staring at your plants, wondering "are they ready yet?" you're not alone. The good news? Learning when to cut THCA flower doesn't require years of experience or expensive testing equipment. With the right knowledge and a systematic approach, even first-time growers can confidently identify the perfect harvest window.
This comprehensive guide provides you with multiple, reliable harvest indicators THCA growers can use to make confident decisions. We'll walk you through visual cues, timeline considerations, and testing methods—complete with descriptions of what you should be seeing at each stage. By combining multiple indicators rather than relying on a single sign, you'll develop the confidence to harvest at peak potency every time.
Before diving into specific indicators, let's address a critical truth about cannabis cultivation: there is no single, foolproof sign that your THCA flower is ready to harvest. Anyone who tells you otherwise is oversimplifying a complex biological process.
Cannabis plants, like all living organisms, develop at their own pace. Genetics, environment, nutrients, and growing conditions all influence maturation rates. What works as a reliable indicator for one strain might mislead you with another. This is why experienced growers always check multiple factors before making the cut.
Think of harvest indicators like pieces of a puzzle. A single piece might suggest an image, but only when you see multiple pieces together does the complete picture emerge. The same applies to THCA harvest signs—trichome color, pistil changes, bud density, and overall plant appearance all tell part of the story.
Here's something that might surprise new growers: experience isn't just about knowing what to look for—it's about learning to trust your observations. Your first harvest might feel uncertain, but with each grow cycle, you'll develop an intuitive sense for readiness. You'll start recognizing subtle changes that don't fit neatly into any guideline.
This experiential knowledge comes from careful observation and record-keeping. Take photos throughout your grow. Note when you first see changes. Compare your results after harvest and curing. This personal database becomes your most valuable reference tool, especially when working with the same genetics repeatedly.
The most reliable approach combines three categories of indicators:
When multiple indicators align, you can harvest with confidence. If some signs say "ready" while others say "wait," patience is usually the right choice. Mature THCA flower photos can serve as helpful references, but remember that your specific plants may present unique characteristics.
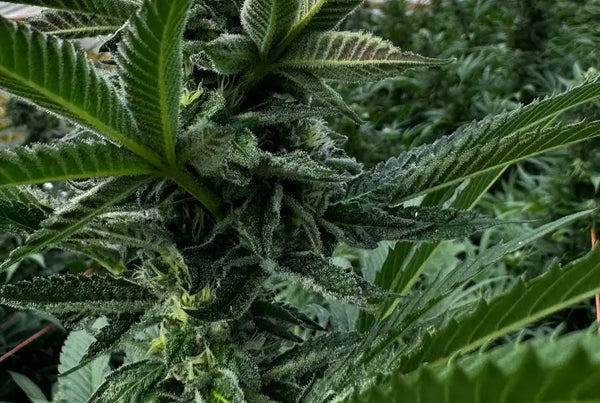
When experienced growers discuss how to know when THCA buds are done, trichome inspection consistently tops the list. These tiny, mushroom-shaped resin glands contain the cannabinoids and terpenes you're after, and their appearance changes dramatically as they mature.
Trichomes go through distinct stages, each visible under magnification:
Clear Trichomes (Early Stage) In early to mid-flowering, trichomes appear completely transparent, like tiny glass mushrooms covering your buds. At this stage, THCA production is ongoing but not yet at peak levels. The heads are fully formed but still developing their cannabinoid content. Harvesting at this stage produces less potent flowers with a more racy, energetic effect profile—generally not recommended unless you specifically want this outcome.
Cloudy/Milky Trichomes (Peak Potency) As trichomes mature, they transition from clear to a cloudy, milky-white appearance. This transformation indicates peak THCA production. When 60-70% of trichomes have turned cloudy, you're entering the optimal harvest window for maximum potency. The flowers will deliver strong cerebral effects with full cannabinoid expression. This is what most growers aim for when seeking ready to harvest pictures to compare against.
Amber Trichomes (Peak Sedation) With additional time, cloudy trichomes begin turning amber or golden brown. This color change indicates THCA degradation into CBN, a cannabinoid known for sedative properties. Some amber (10-30%) mixed with mostly cloudy trichomes provides balanced effects. More amber (30-50%+) produces increasingly sedative, body-focused effects. For traditional THCA flower, you generally want to harvest before significant amber development.
Most growers target this trichome ratio:
This ratio balances potency with effect profile. Adjust based on your preferences: harvest slightly earlier (more cloudy, less amber) for energetic effects, or slightly later (more amber) for relaxation.
Magnification Tools You'll need 60-100x magnification to properly assess trichomes. Options include:
Inspection Technique
Taking Reference Photos Creating your own visual guide to harvesting THCA flower helps build your skills:
While not as reliable as trichomes, pistil (the hair-like structures on buds) color changes provide a helpful supplementary indicator for determining when to cut THCA flower.
White Pistils (Early Flowering - Weeks 1-4) Fresh pistils emerge bright white, standing straight up from calyxes. During this stage, flowers are actively growing and nowhere near ready for harvest. The plant is in full development mode, with new pistils continuously appearing. This is what early-stage growth looks like—patience is essential here.
50% Orange/Brown Pistils (Mid-Flowering - Weeks 4-6) As flowering progresses, pistils begin changing from white to orange, red, or brown. When roughly half have changed color and curled inward, you're in mid-flowering. The plant is still developing, and harvest is premature. However, this stage indicates good progress and suggests you should begin monitoring more closely.
70-90% Darkened Pistils (Harvest Window - Weeks 6-10+) When 70-90% of pistils have darkened and curled back toward the bud, you're approaching or within the harvest window. However, pistils alone don't tell the complete story—always confirm with trichome inspection. Some strains naturally maintain more white pistils even at maturity, while environmental stress can cause premature pistil darkening.
Pistils serve a reproductive function—they're designed to catch pollen. When pollination doesn't occur (as in sensimilla cultivation), pistils eventually die back and change color. This process roughly correlates with flower maturation but isn't directly tied to cannabinoid development.
Several factors can cause pistil color changes unrelated to maturity:
This is why pistils work best as a secondary check rather than your primary indicator. Use them to confirm what your trichome inspection already suggests about harvest indicators THCA growers rely on.
Think of pistils as your "rough gauge." If you see mostly white pistils, you definitely aren't ready regardless of what else you observe. If you see 70%+ darkened pistils, it's time to check trichomes closely. The pistils are essentially a reminder to dig deeper into your inspection routine.
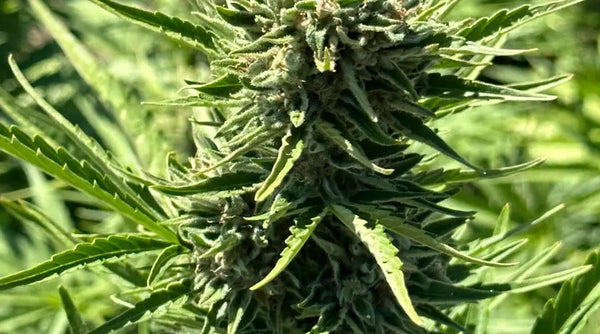
Understanding what does ready to harvest THCA look like requires examining the buds themselves, not just trichomes and pistils. Mature buds display distinct structural characteristics that differ significantly from developing flowers.
Early to Mid-Flowering Structure During active flowering, buds appear somewhat loose with visible spacing between calyxes. New calyx growth is obvious, with small, fresh formations appearing regularly. The buds feel relatively light and airy, lacking the density and weight associated with maturity. This is active development—the plant is building structure.
Mature Bud Characteristics As mature THCA flower approaches harvest readiness, distinct changes occur:
Not all strains produce equally dense buds. Sativa-dominant varieties naturally grow airier flowers, while indica-dominant strains typically produce tight, compact nugs. Don't compare your sativa-leaning strain to dense indica harvest readiness indicators—know your genetics and what to expect.
Research your strain's typical characteristics. Breeder descriptions and grow reports from other cultivators provide valuable baselines for what "done" looks like for your specific genetics.
When checking bud density and structure:
Weekly check-ins allow you to notice changes without constant manipulation. Take weekly photos from consistent angles to document progression—you'll be surprised how much development photos reveal that your eyes miss day-to-day.
Many growers report a final "swell" in the last 7-14 days before peak ripeness. Buds that seemed nearly done suddenly put on noticeable size and density. This is often the moment when checking how to know when THCA buds are done transitions from "getting close" to "ready now." Monitor closely during this period, as this final development phase delivers significant potency gains.
Leaf color changes during late flowering confuse many new growers. Understanding what's normal versus problematic is crucial for accurate harvest timing and recognizing THCA harvest signs.
As cannabis plants near maturity, they naturally begin a process called senescence—essentially, the plant's version of autumn. This natural aging process involves:
Fan Leaf Yellowing Large fan leaves, particularly lower and older ones, begin yellowing from the tips inward. This is the plant reallocating nutrients from leaves to flowers for final development. Nitrogen, in particular, is mobile within the plant and moves to buds during this phase. Yellowing that starts with lower, older leaves and progresses upward is typically natural and even desirable in late flowering.
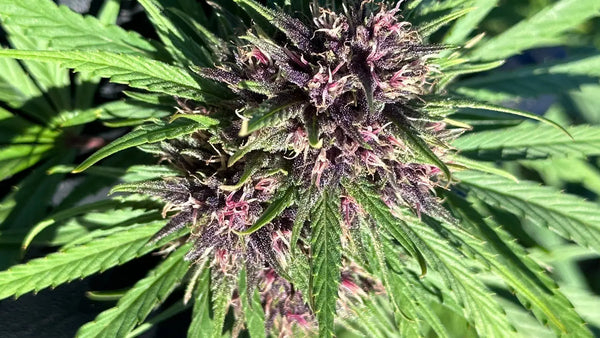
"Fall Colors" Development Some strains express beautiful purple, red, or pink coloration as temperatures drop or flowering concludes. These anthocyanins are natural pigments that become visible as chlorophyll breaks down. Cool nighttime temperatures (but not freezing) can enhance color expression in genetically predisposed strains.
Healthy vs. Problematic Color Changes Natural senescence differs from nutrient deficiencies:
Natural Senescence Signs:
Nutrient Deficiency Warning Signs:
Significant fan leaf yellowing—where 50%+ of leaves have changed color—often coincides with the harvest window for THCA flower ready to harvest. This makes sense biologically: the plant has mobilized nutrients to complete flower development and cannabinoid production.
However, leaf color alone never determines harvest timing. Use it as one piece of the puzzle, confirming what trichomes, pistils, and bud structure already suggest. Some growers deliberately induce fade through controlled nutrient reduction in late flowering, believing it improves final product smoothness. Others maintain feeding until the end. Either approach works if other indicators align at harvest.
Ask yourself:
If leaves are changing but buds look fantastic with proper trichome development, you're witnessing natural senescence. If leaves are changing AND buds seem stunted or stressed, you may have underlying issues to address.
Stepping back to observe the complete plant provides context that close-up inspection misses. Certain whole-plant behaviors indicate approaching harvest for mature THCA flower photos documentation and actual harvest decisions.
Active Growth Characteristics:
Finishing Mode Characteristics:
When a plant transitions into finishing mode, it's focusing energy exclusively on bud maturation rather than vegetative growth. This behavioral change often occurs 1-2 weeks before optimal harvest and serves as a valuable harvest indicator THCA growers should monitor.
Track your watering schedule and soil moisture levels. Many growers notice that as harvest approaches:
This doesn't mean the plant is dying—it's completing its lifecycle. Reduced water demands align with ceased vegetative growth and the plant's focus on final flower development.
However, don't confuse reduced water needs with dehydration. Continue watering when needed, just expect to do so less frequently. Overly dry conditions can cause premature pistil darkening and trichome degradation, confusing your assessment.
Cannabis is an annual plant programmed to complete its lifecycle within a season. As what does ready to harvest THCA look like manifests visually, you're essentially witnessing the plant's natural preparation for end-of-life. This includes:
Understanding this biological imperative helps you recognize genuine maturity signals versus stress responses that might look similar.
At least once weekly, step back and observe each plant from a distance:
This macro perspective complements micro inspections of trichomes and buds, providing a complete picture for confident harvest decisions.
While visual indicators remain most reliable for determining when to cut THCA flower, understanding typical timelines helps set realistic expectations and prevents premature harvest anxiety.
Most cannabis seed and clone suppliers provide estimated flowering times—usually ranging from 7 to 12+ weeks depending on genetics. These estimates offer a useful starting point but require important context:
Variables Affecting Timeline:
Using Breeder Times Effectively: Think of breeder times as the earliest you might consider harvest. Add 1-2 weeks to the estimate as your realistic target. For example, a strain listed as "8-9 weeks flowering" will likely be ready in weeks 9-11 for most growers. This prevents disappointment and premature harvesting.
Understanding typical visual guide to harvesting THCA flower progression helps you know what to expect:
Weeks 1-3: Initial flower formation, white pistils emerging, very loose bud structure, no harvest consideration
Weeks 4-5: Buds filling in, increased pistil production, some pistils may darken, trichomes forming but mostly clear, definitely not ready
Weeks 6-7: Noticeable bud size increase, 30-50% pistil darkening, trichomes becoming cloudy, entering the "monitoring closely" phase
Weeks 8-9: Significant density increase, 60-70% pistil darkening, mixed clear/cloudy/amber trichomes, approaching harvest window
Weeks 10+: Peak density achieved, 70-90% darkened pistils, predominantly cloudy with some amber trichomes, in or past optimal harvest window
These are generalizations—your specific strain may progress faster or slower.
Indoor Growing:
Outdoor Growing:
Outdoor growers face unique challenges—sometimes you must harvest slightly early to avoid frost damage. This makes strain selection critical; choose genetics that finish within your available growing window.
Indica-Dominant Strains:
Sativa-Dominant Strains:
Hybrid Strains:
Research your specific strain's typical flowering behavior through grow logs and reports from other cultivators working with the same genetics.
Knowing when NOT to cut is as important as recognizing THCA flower ready to harvest. Several common scenarios cause growers to harvest prematurely or wait too long, compromising quality and yield.
What Premature Flowers Look Like:
Why Premature Harvest Happens:
Consequences of Early Harvest:
The final 2-3 weeks of flowering deliver massive improvements in potency and yield. Harvesting just a week or two early may feel minor but substantially impacts your final product quality.
Common Misleading Indicators:
Sugar Leaf Trichomes Sugar leaves (small leaves protruding from buds) show amber trichomes 1-2 weeks before calyx trichomes. New growers often harvest too early by inspecting leaves instead of buds. Always check trichomes on calyxes, not leaves.
Pistil Color from Stress Heat, light stress, or physical contact darkens pistils prematurely. If 70% of pistils are dark but trichomes are mostly clear and buds feel underdeveloped, those pistils are lying to you. Trust trichomes over stressed pistils.
Breeder Time Reached Hitting the breeder's stated flowering time doesn't mean harvest readiness. Your growing conditions differ from the breeder's. Let the plant—not the calendar—determine harvest timing.
Rapid Leaf Yellowing If fan leaves suddenly yellow in weeks 4-6 of flowering, this likely indicates a problem, not maturity. Address the underlying issue and give the plant time to recover and finish properly.
While less common than premature harvest, waiting too long also degrades quality:
Signs of Over-Ripeness:
The Narrow Window Challenge Once plants hit peak ripeness, you typically have a 5-7 day window before quality begins declining. This is why daily inspection becomes crucial during the final week. Most growers prefer to harvest slightly early rather than risk over-ripeness if they can't check plants for several days.
Certain situations tempt growers into panic harvesting:
Ask yourself: "Will this problem definitely destroy my crop if I wait one more week?" If the answer is no, patience usually rewards you with better results.
Successfully determining harvest readiness indicators requires synthesizing all the information we've covered into a systematic approach.
Step 1: Trichome Inspection (Primary Indicator)
Step 2: Pistil Color Check (Secondary Confirmation)
Step 3: Bud Structure Assessment
Step 4: Overall Plant Observation
Step 5: Timeline Verification
Harvest with confidence when you see:
This alignment signals mature THCA flower ready for harvest.
If some signs say "ready" while others say "wait":
The most valuable resource for future grows is your own documented experience:
Create Your Visual Library:
Track Outcomes:
Compare and Learn:
After your first few harvests using this multi-factor approach, you'll develop an intuitive sense for readiness. Those multiple data points consolidate into a gut feeling that becomes increasingly reliable. However, always verify that feeling with actual inspection—even experienced growers benefit from confirming instinct with observation.
Q: Can I harvest different parts of the plant at different times? A: Yes! This is called staged harvesting. Top colas often mature 3-7 days before lower buds. You can harvest main colas first, then give lowers more time to develop. This maximizes overall quality and yield.
Q: What if I don't have a microscope to check trichomes? A: While trichome inspection provides the most reliable harvest indicators THCA, you can still make good decisions combining pistil color, bud density, timeline, and overall plant appearance. Consider investing in a $10-20 jeweler's loupe for next time—it's worth it.
Q: How much do trichomes change in just a few days? A: In the final 2 weeks, trichome changes accelerate dramatically. What looks like 30% cloudy can become 70% cloudy in just 5-7 days. This is why daily inspection becomes important once you enter the harvest window.
Q: Do indoor and outdoor plants show different THCA harvest signs? A: The signs themselves remain the same—trichomes, pistils, bud structure, etc. However, outdoor plants may develop more slowly due to temperature fluctuations and shorter daylight hours in fall, requiring longer timelines.
Q: My buds don't look as frosty as ready to harvest pictures I see online. Is something wrong? A: Strain genetics primarily determine resin production. Some strains naturally produce fewer visible trichomes while still being potent. Also, lighting in photos can exaggerate frost appearance. Focus on trichome development, not just density.
Q: Can I harvest too late and destroy my crop? A: Significant over-ripeness (multiple weeks past peak) reduces potency and produces overly sedative effects, but it won't "destroy" your crop. You'll still have usable flower—just not optimal. The bigger risks of waiting too long are mold development and physical trichome degradation.
Q: What's the best time of day to harvest? A: Many growers prefer harvesting in the morning after the dark period, believing terpene and cannabinoid concentrations peak then. However, there's limited scientific evidence for dramatic differences. Harvest when convenient within your optimal window.
Q: Should I flush before harvest, and does it affect timing? A: Flushing (watering with plain water for 1-2 weeks pre-harvest) is debated. If you choose to flush, begin when trichomes show 50% cloudy—approximately 1-2 weeks before your target harvest. Flushing timing is based on readiness indicators, not a predetermined calendar date.
Q: How do I know if my visual assessment matches what does ready to harvest THCA look like in professional grows? A: Professional operations use the same indicators you do—trichomes being primary. Differences in appearance between home grows and commercial cannabis maturity photos usually reflect genetics and growing techniques rather than harvest timing. Your properly-timed harvest may look different from professional grows but can be equally high-quality.
Q: Can weather affect outdoor harvest timing? A: Absolutely. Cool fall temperatures can slow final development, potentially extending flowering by 1-2 weeks. However, approaching frost dates may require harvesting slightly early. Check extended weather forecasts and be prepared for emergency harvest if hard frost threatens.
Learning how to know when THCA buds are done transforms from an anxiety-inducing guessing game into a systematic, confidence-building process once you understand what to look for and how to interpret the signs your plants provide.
Remember these key principles:
The path to harvest mastery isn't about getting it perfect the first time—it's about learning to observe, document, and refine your approach with each grow cycle. Your first harvest might feel uncertain, but by your third or fourth, you'll recognize maturity intuitively while still confirming with methodical inspection.
Take photos of your current grow at every stage. Compare them to mature THCA flower photos from other growers and to your own past grows. Build that visual reference library that becomes increasingly valuable with each added harvest. Your accumulated observations become more reliable than any single guide could ever be.
Most importantly, embrace the learning process. Every grow teaches something new, even after years of experience. The beautiful complexity of cannabis cultivation ensures there's always more to discover, more to refine, and more to appreciate about these remarkable plants.
When you do reach that perfect harvest window—when trichomes shimmer with cloudy perfection, pistils have gracefully darkened, and buds feel dense and complete—you'll know the patience was worth it. That moment of cutting your perfectly-timed harvest delivers a satisfaction that goes beyond the quality of the flower itself. It's the culmination of months of care, observation, and the rewarding application of knowledge gained.
Now you have the complete visual guide to harvesting THCA flower—use it well, share your experiences with other growers, and enjoy the fruits of your perfectly-timed harvest.
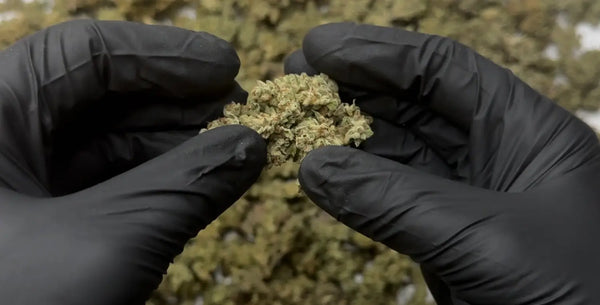
Looking to experience premium THCA flower? Explore our carefully curated selection of high-quality THCA products, all harvested at peak ripeness for optimal potency and effect.